![]()
![]()
Frequently Asked Questions / Help
Group Set-up
 Delete or Temporarily Remove Participants
1) Delete Participants:
- Go to the Layout Screen and long tap on any icon
- Tap the garbage can at the bottom of the pop-up to delete the participant
- *Note: You can delete a participant at any time before or even during the mapping
2) Remove Participants from a mapping session, meeting, or lesson:
- To remove a participant from the mapping screen without deleting him/her from the overall group, simply pull the icon to the bottom of the layout screen.
- When in the mapping screen (even when your class or meeting is recording) return to the layout screen by tapping the “Settings” button in the top right corner of the mapping screen:

- Select “Edit Group Layout”
- To remove a participant simply slide the icon to the bottom tray.
- You can also move any of the icons or add additional participants, even while the meeting is still be recorded and the visual mapping will adjust accordingly.
- Once complete, tap “Done” and you will return to the mapping screen.
 2
2
 0
0
Deleting Group or Session
Delete or Temporarily Remove Participants
1) Delete Participants:
- Go to the Layout Screen and long tap on any icon
- Tap the garbage can at the bottom of the pop-up to delete the participant
- *Note: You can delete a participant at any time before or even during the mapping
![]()
2) Remove Participants from a mapping session, meeting, or lesson:
- To remove a participant from the mapping screen without deleting him/her from the overall group, simply pull the icon to the bottom of the layout screen.
- When in the mapping screen (even when your class or meeting is recording) return to the layout screen by tapping the “Settings” button in the top right corner of the mapping screen:
- Select “Edit Group Layout”
- To remove a participant simply slide the icon to the bottom tray.
- You can also move any of the icons or add additional participants, even while the meeting is still be recorded and the visual mapping will adjust accordingly.
- Once complete, tap “Done” and you will return to the mapping screen.
![]()
2
0
Mapping Screen
Tracking Class / Meeting Actions:
At the top of the mapping screen you will find the five meeting / class actions that you can track. These are often used by facilitators, instructional coaches, administrators or teachers to track the overall flow of the class or meeting.
Each time you select one of these buttons, Equity Maps will track the time of that event, and if the microphone is on, it will also record the audio of that event.

Tap on the icon that indicates the group’s actions at the time:

Chaos: When more than one person is talking at once.
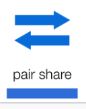
Pair Share: When students/participants are paired to share information.

Small Group: When students/participants are grouped for limited periods of time before coming back together in a large group.

Silence: When the group is silent, no one is speaking or the teacher/facilitator is waiting.

Media: When the group is reading, watching, or listening to a piece of media during the class or meeting. Media is selected when the group is watching a video clip, listening to a clip or reading an extract.
1
0
Audio Recording during the class or meeting:
The Microphone is set to default “Off” position. In order to record your meeting you must press the microphone icon on the top of the mapping screen:

Once pressed, the mic will be enabled and look like this:
![]()
Once the mic is enabled it will record audio of each participant as you tap on the corresponding icon. If you’ve got a larger group it is also effective to use an external USB microphone with an extension cable so that the mic can be placed in the center of the group. Note that not all USB Microphones work with the iPad and you will need the Apple USB Camera Adapter. Here’s a link to a helpful explanation of how you can hook up a USB Microphone to your iPad.
0
0
Delete or Temporarily Remove Participants
1) Delete Participants:
- Go to the Layout Screen and long tap on any icon
- Tap the garbage can at the bottom of the pop-up to delete the participant
- *Note: You can delete a participant at any time before or even during the mapping
![]()
2) Remove Participants from a mapping session, meeting, or lesson:
- To remove a participant from the mapping screen without deleting him/her from the overall group, simply pull the icon to the bottom of the layout screen.
- When in the mapping screen (even when your class or meeting is recording) return to the layout screen by tapping the “Settings” button in the top right corner of the mapping screen:
- Select “Edit Group Layout”
- To remove a participant simply slide the icon to the bottom tray.
- You can also move any of the icons or add additional participants, even while the meeting is still be recorded and the visual mapping will adjust accordingly.
- Once complete, tap “Done” and you will return to the mapping screen.
![]()
2
0
NO! Equity Maps is a native, stand-alone app, so no need for additional accounts. This also helps to keep your data safe because it only exists on the user’s device.
1
0
Add participants or move participants around in the seating chart, even after you’ve started the session.
Two ways to edit participants once you’ve started the meeting:
A) Pause the Class / Meeting while mapping and edit the layout
1. In the Mapping Screen, tap Pause![]() (This will pause all recording of voice and time).
(This will pause all recording of voice and time).
2. In the same Mapping Screen, tap “Edit layout: ![]()
3. While in the layout screen, you can move the icons, change colors, edit titles, or add new participants.
4. Once complete, tap “Done” to return to the mapping screen: ![]()
5. Press “Resume” to continue mapping your meeting: ![]()
B) Continue Recording the Class / Meeting while you edit the layout or add a participant
1. In the same Mapping Screen, tap “Edit layout: ![]()
Note that Equity Maps will continue to record the audio and will continue to count time for the speaker who was last speaking at the time you selected “Edit Layout”
2. While in the layout screen, you can move the icons, change colors, edit titles, or add new participants.
3. Once complete, tap “Done” to return to the mapping screen: 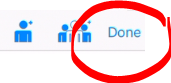
4. You will be returned to the mapping screen, where you can tap on the next speaker or group action.
0
0
Devices / Platforms
NO! Equity Maps is a native, stand-alone app, so no need for additional accounts. This also helps to keep your data safe because it only exists on the user’s device.
1
0
—